Feeding Baby Chameleons
Getting Ready To Feed Babies?
So you decided you are going to breed that pair of chameleons you spent so much time raising up. You breed them; the female is gravid, and lays her eggs. Now comes the long wait for the little ones to emerge. So what do you do in the mean time? I am going to go over a very easy way of preparing yourself for the arrival of numerous hatchlings or neonates. The main things you will need are small food prey (lots of it!), housing, and live plants. The cost of keeping and housing all these new chameleons can drain your wallet if you wait till the last minute. “Oh no, they are hatching! Where can I find food fast, housing, and living environment?” Well, what if I told you, YOU can find it all at home – if you plan ahead. You will save LOTS of money while you are at it!
In the first article of a two part issue, I will cover the food issue. The second article will cover the latter two topics. So let’s talk FOOD! Food and lots of it, the correct size, variety, and consistent supply of it will be a key factor to your success. I will cover 3 of the most common food items that can be found all over the net and at your local pet shop. You probably already have two of the three now. Everyone wants to save a buck. Well, you can! When you add it all up you will save a lot more then a buck!
The 3 food items will consist of pinheads (PH), fruit flies (FF), and silkworms (SW). I know what you are saying, “I don’t have any of those right now”. Well you should have crickets and/or silkworms; you still need to feed the parents where all those eggs came from. The PH are crickets and SW come in all sizes. The newly hatched worms make a great food source for babies. Both of these food items can be bred and raised fairly easy with minimal time and effort, saving you LOTS of money down the road. How you ask?
Let’s start things off with pinhead crickets (Acheta domestica (PH)). You have all those crickets you feed to your adult chameleons on a daily basis. Most of us order bulk crickets, 1000 or more at a time as this is the most economical way. So you store them in a box (see cricket box), gutload them offer fresh fruits and vegetables and just feed them out till they’re all gone or die. Right? Well, why not get the most out of your cricket purchase? Why not breed them? They are not of use until they become FOOD and probably have already bred in the box! It is very easy to do, so easy you are going to ask your self “Why did I not think of that?”
Crickets don’t need much to breed. As long as you supply some key essentials for them you will soon have so many you won’t know what to do with them all. To breed crickets successfully you will need to provide a good food source, living space(see cricket box), heat (if you live in a cold climate area), good mix of males and females for breeding (when you buy bulk you will have a good mix), and, finally, a place for the females to deposit eggs. So the key is a place for the females to lay eggs in because just by keeping the crickets for food you already have the other stuff covered. The egg depository is a very simple, small container filled with moist soil (I use “Super Soil”. It is a good mix of dirt and sand) that can be rotated out and replaced with another.
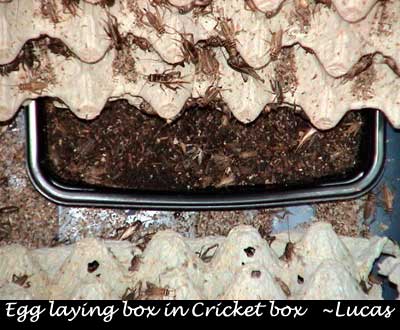
I use the left over plastic containers frozen foods come in (1-2″ high), but you can use just about anything small enough to fit inside the cricket box you have laying around. I switch them out at least once a week. (optional; you can cover the egg laying containers with aluminum window screen to keep the males from eating the eggs. The females will still be able to stick their ovipositor through the screen to deposit eggs. I have found that I get plenty of eggs without using the screen. It is your choice.) You will need to spray the dirt with water very wellbefore you place it in with the crickets. When you remove the containers filled with eggs put the containers inside a plastic shoe box with the lid on for incubating. These eggs need high humidity to hatch and can be incubated at room temp. The eggs will hatch in 3-6+ weeks depending on the room temperature. The cooler it is the longer they take to hatch. I had some go as long as two months at 60F, and some hatch in 3 weeks at 80F and some 1 week at 90F. Each container of eggs will contain 1000’s of eggs which will hatch into 1/16″ pinheads – perfect size! Ever order crickets of one size and get another? I think everyone has had this nightmare. Now that you are breeding your own supply you will have many sizes to choose from!
The newly hatched pinheads will be white in color. In just a few days they will turn a clear/gray color, then brown as they grow. Once you see them start to hatch you will need to move the containers of eggs into an 18 gallon plastic box just like the adult crickets are in, but the newly hatched crickets can climb the side walls so put some tape around the top of the box. About 3-4″ from the top should do the job. Remove the container of eggs after about one week after all the eggs have hatched. I have found if you prop up the container of eggs, as the crickets hatch they jump out of the egg container and into the PH box. Otherwise, they tend to stay in the dirt. Feed them the same as you do the adult crickets, but in smaller amounts. You can also substitute the water source of fruits and vegetables with fruit juice and Agar Agar mix to make a safe gel based water source. (See Agar Agar recipe) This stuff can be made with any liquid juice and last a long time. It is inexpensive and doesn’t stink like rotting fruit/veggies when you don’t clean them out. It is very similar to the products sold as cricket water.
There you have it. A renewable source of pinhead crickets. You should start production a few months before the babies are due to start hatching (or sooner to get the hang of it and work out any problems). The sooner you start the better off you will be. Give yourself the extra time so you get the hang of the process and allow time for any mistakes. This way you can turn a $16 cricket bill of 1000 crickets into 1000’s of pinheads for pennies on the dollar. Even if you only get 1000 pinheads out of 1000 adults you save the $14 you would spend on ordering pinhead crickets. (You should be able to get around 5-10 thousand plus crickets out of a 1000 cricket order.) The food you already have. So all you will really need to invest in is some time, a few plastic shoe boxes, and one large plastic box to keep all the pinheads in after they hatch to await their turn to be food. You can also, over time, breed and raise your own crickets to adults over and over again with out have to spend $16 every few weeks on new stock. Just think of how much money you can save, for minimal time invested each week, and never have to worry about ordering one size and getting another. But whether you raise them to adults or not, a ready supply of thousands of pinheads is a major boost to your chances of successfully rearing your new clutch of chameleons.

Fruit flies (FF) are an easy food source to produce. These are usually fed to the babies as their first meal after they hatch. There are two main fruitflies used for raising babies the Drosophila melanogaster andDrosophila hydei. D. melanogaster is lighter in color and the smaller of the two, being only 1/10 inch. D. hydei is darker in color with red eyes and approximately 1/8 inch in size. Both can be kept the same way with the same medium (food). The D. melanogaster reach sexual maturity sooner then the D. hydei, 14:28 days. An adult female can lay up to 500 eggs over a week’s time.
There are many different culture kits and Do-It-Yourself media recipes out there. Since this is all about saving you money we are going to go over a pre-mix medium (just add water) and homemade media. I would suggest starting off with a pre-made medium and then once you get the hand of it try a few recipes. The pre-made media are very simple, just add water, the homemade are more time consuming and could cost more in the long run if you only need flies for a few months and not year around. For home made recipes see (Homemade FruitFly media).
The pre-made medium can be bought where you buy your fly cultures. Everyone has their own mix so there is no one medium. I would start off by buying one FF culture of D. melanogaster and one D. hydei, medium size bag of pre-made FF media, 5-10+ 32oz. clear plastic cups, lids for the cups with a cloth already glued to the lids, and some fiber glass window screen, (vials are optional for storing the FF but not needed). This way you can get theone culture starting and reproducing. Since you have no mouths to feed right now, you can use the flies to start new cultures with the extra cups and media you purchased.
Each pre-made medium will come with instructions on how to mix it. Just follow the directions. Use small piece of fiber glass screen to provide a place for the FF larvae to dry out on. Each media has a different expiration time where it no longer is active. Most will last 3 weeks to a month plus. Before you know it you will have 5-10 cultures (you will need at least 5-10 cultures to feed your clutch of babies depending on the number of hatchlings). Once you start to feed them out take flies from different cultures each day so that you don’t take flies from the first culture again until you have taken them from the other 5-10. This way it will give the flies time to breed and lay eggs before they become food. This starts the reproduction process over again, so that the cultures will still produce for you.
When you feed the fruitflies to the chameleon babies try placing a small piece of fruit in the cage by the chameleon’s favorite spot to eat. This will attract the FF and keep them in one place while the babies have a feast. Bananas and strawberries seem to be a favorite of the FF and will also add to the chameleon’s nutrient intake. Have fun. Once again, the sooner you start production the better off you will be. I would start no later then 3 months before the chameleon eggs are due to hatch. The fruitfly is often the only food item they will eat for the first week or so. YOU WILL NEED LOTS OF THEM!
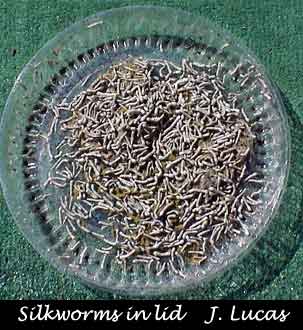
Now let’s talk silkworms, Bombyx mori(SW). They are not hard to keep and breed as some might think. Their food source is one of two things, either silkworm chow or fresh mulberry leaves. If you have chameleons and you don’t already have a mulberry tree or one close by you can use, go to your nursery (if they will grow in your area zone) and buy one TODAY. You will thank me when next year comes around and you don’t have to buy chow. It will be one of your best investments you made so far! You can start off with silkworm eggs or worms. Either way you need to grow them to their adult size of about 2 ½”-3″. At this size they will start to cocoon. You can then start the breeding process.
If you choose to start off with eggs, you will need to incubate them at 80-82F. I like to use chow for the first few weeks even if I have mulberry leaves available. The newly hatched worms seem to do better on the chow at this age because it is easier for them to eat. You will want to place a few pieces of the chow around the sides of the eggs (lid on) the worms will crawl over to the food. After most of the eggs have hatched grate (with a cheese grater) a light layer of chow over all the worms so you don’t kill any eggs that would have hatched. They will instantly crawl to the top and chow down!
Repeat this every day or every other day as the food disappears. Be careful not to overfeed as it can cause mold to grow especially in the first few weeks when the worms are so small. After about one week with the lid on, remove the lid and transfer the worm to a plastic shoe box with no lid. The worms will not crawl out as long as you feed them. As they grow larger you will need to feed more everyday. They will make silk pathways in the shoe box. It is not mold, but can be confused with mold. It is important to let any leftover food from the previous day dry out as not to cause mold growth. There will also be lots of feces in the bottom of the shoe box. This is nothing to worry about. The less you touch them at under ½” the better success you will have.

Once they reach 1″ in size it is time to clean out all the feces/leftover food/silk. At this size, touching them doesn’t seem to bother them much. Remove all the waste and place them back in the clean shoe box. Feed and repeat the process over until the worms are about 3″. At this time you will need to transfer them to a cardboard box with paper towel rolls (see Silkworm cocoon box). Put only 75-100 worms per box at a time. Continue to feed, but keep the box closed (dark). The worms will excrete some liquid (this is built up waste), shrink and start to cocoon in the paper towel rolls and top corners of the box.
After they have cocooned and the cocoon is hard, remove it and place them all in one shoe box. The moths will emerge from the cocoon in a few weeks and instantly start to breed and lay eggs. I check them after about 3 weeks to see if any are starting to hatch. You will notice a brown dot (cocoonase) at one end of the cocoon or you will see moths. I remove the moths and their cocoons as they emerge and place the moths all in one shoe box with wax paper as a liner on the bottom and throw away the cocoon. They will breed right away and the females will lay their eggs on the wax paper. This makes removing the eggs very easy. The fertile eggs will turn from yellow to a dark purple color. Don’t remove the eggs until they change colors.
After they turn purple the eggs must then be place in the refrigerator for about 3 months. This subjects them to a winter and allows you to remove them as needed to hatch. You can use Elmer’s glue and glue them down to a small container with a lid or Petri dish. Repeat the process and you will have a constant supply of tiny silkworms to feed your offspring. Grow the worms larger as the babies grow. You should start this right away. Silkworms are a favorite food for chameleons and one of the best staple food items.
A Few Hints & Tips
1. Ants- they can be a nuisance, a 2-3″ wide wall of Vaseline helps keep them out, also plastic packing tape helps, they cant cross over it on vertical surface because they can not get a grip.
2. Cricket Box- When placing the egg laying container in the box make sure the females have access to it. This is solved by setting the last of the three pieces of egg crate they are shipped with on top of the egg laying container and the other two resting up against it.
3. Pinhead Box- You can use paper towel rolls for the pinhead to make home in if you don’t have egg crate either one works fine. Use plastic packing tape around the inside of the box to keep the new pinheads from crawling out. Once they are a few weeks old you will not have to worry about them trying to climb out.
4. Food- When feeding the new pinhead crickets only feed small amounts of food at a time. This keeps it from molding.
5. Egg Container- IF you notice a lot of dirt in the bottom of the cricket box try not filling the containers with so much dirt and make sure there are always food and a water source. This will keep the males from eating the eggs. You can also as mentioned above use aluminum window screen as a cover, but I find it not necessary.
6. Cricket Eggs- When the cricket eggs are incubating, check for mold on the dirt. If you see mold throw away only the top layer of dirt. The rest is fine and you won’t loose all the eggs. Also wipe down the shoe box and lid of extra moisture. This should solve your problem.
7. Fruitfly cultures- If the media molds throw the culture out immediately and start a new one. Don’t throw out the container, clean thoroughly and reuse.
8. Silkworms- If they start to climb out of their shoe boxes it is a sign there is not enough food or too many worms in the box. The only thing to really watch for with the silkworms is mold.